About the Class
In the Digital Sound Lab course we focused on tools for creating basic audio material, and generally treated it as if it were to be used in a linear narrative context. The purpose of this class is to expose you to the other side of the coin, namely the ways in which you can create audio material in a non linear, more interactive or spontaneous context. The primary tool we'll be using for this purpose is the Max programming environment from Cycling74. With the recent addition of jitter to Max's already formidable arsenal of tools, the course will fall into roughly three categories: MIDI (Musical Instrument Digital Interface), DSP (Digital Signal Processing via Max's MSP component), and Jitter (realtime video processing via Max). MSP is a good itroduction to interactive audio techniques due to it's highly developed GUI. However, it is not the only solution out there by far. For it's excellent documentation and instant-gratification-factor I've chosen James McCartny's Supercollider as our alternate programming enviroment. It's about as far from MSP as you can get, so it's a great way to see some of the possibilities.
It's a pretty simple thing to generate streams of musical notes via the input of your choice (midi device, hair dryer, pulse rate), but there are many types of control available through MIDI and I'll try to keep you focused on ways to go beyond the simple creation of keystrokes'. MIDI is a useful low bandwidth tool for supplying input to and output from a system, but as CPUs have increased in capacity and speed, the need for MIDI as communication for hardware synthesizers is shifting over to one of several choices for control of softsynths', synthesizers that exist in software alone. Max began as a midi tool, which was transformed a few years ago into a complete digital audio/video creation suite. We will start with an orientation/overview of all things electro-musical to put things into perspective, along with an introduction to the sound resources at ITP. Then we will focus on the basic elements of midi and the midi studio, which will quickly get us into Max, the mastery of which will be our main focus. People come into the class with varying degrees of experience, and I'll endeavor to calibrate the learning curve accordingly.
Your participation and suggestions will play a major role in shaping the direction of the class. If you have other topics you wish to have attention given to, don't hesitate to suggest them. For some reason we still don't have a good paperbook on MSP/Jitter, aside from the Winkler book on Max, which is basically just Max. There is, however, Designing Sound: Procedural Audio for Games and Film, by Andy Farnell ( http://aspress.co.uk/ds/ ), which is largely devoted to MSP's open source twin PD (PureData) which is a highly detailed/technical approach to sound design via Physical Modeling.
It's generally agreed that the best way to get up to speed with MaxMSP is by diligently running the tutorials, supplemented with study in the MaxMSP/Jitter documentation. For an overview of MIDI and some good technical charts, get MIDI for the Professional, by Lehrman & Tully. available at the book store, or, of course, amazon. I've just ordered a copy of MusiMathics Vol2, which also looks very promising, as does vol.1. Not cheap though. Usually we'll be creating something new in class. It is crucial that you bring in the work you've done during the week, to provide raw material for discussion, and also as a way to get feedback or help. Keep your thumbdrive handy for easy transfer of materials into the classroom computer, or in the case of midi you can easily place them in your itp directory (or save in gmail) and ftp them right onto the desktop. It's also easy now to transfer files to the classroom computer from whatever workstation you're at on the floor via ethernet. You can also retrieve class examples and missing max objects, patchers from the classroom machine to the workstation you're at. All the floor machines use the standard itp login/pwd. You are also encouraged to sign out cd burners to back up your larger work, if you've been generating large video or audio files, for instance. The floor routinely wipes the drives, and you don't want to lose all that work. IMPORTANT: Any files you pass back and forth across ftp need to be properly named, to avoid corruption. For Max patchers, you can simply save as a 'max text' file from within the program (be sure to use .txt as the file suffix). The other option is to archive the file into a .zip or .sit. The Macintosh does not attach a suffix by default, so if you try to simply email me with your file attached, if it doesn't have the proper suffix, my pc will misinterpret it, as will most any unix server you put it on. You can save a Max file as .mxb, which is the Max identifier, please don't use .pat (also in use) because Photoshop also uses that suffix for their PATterns.
Be sure to check my web page periodically for updates, syllabus changes, and most importantly, for the Soundlab Help Files. My email is: daniel.palkowski@nyu.edu. In class I'll give you a better email address, though. I'll be around on afternoons before class to see what you're up to, and can be reached during the day at my work number. You can also call if you need assistance in the labs (can't get sound, midi, etc.) I'll give the numbers in class. There is also a list where you can post questions,comments, news, etc., it is itp-sound. You get to it via http://home.nyu.edu, and subscribe with your net id and a password which I'll give in class. I'll also give you an IM address so you can send me an aol or gmail IM from any pc if you have trouble or a question.
Here is a general plan for material to be covered. The flow of topic should be taken with a gain of salt, since the course content is to be adapted (it is a workshop, after all, and especially since it's a shortened summer course) to your specific interests and needs, which we'll seek to ferret out in the first couple of classes.
Class 1
Class introductions, survey of goals & aspirations
A Brief History of Electronic Music Technology, Evolution of MIDI
Discussion of the major trends in electronic music, playback of samples
from different eras, overview of technologies and approaches.
Analysis of musical elements, enumeration of specific musical parameters in an electronic context.
Basics of cpu configuration for sound. A number of apps will be launched and quickly set up for I/O
Intro to Max5. The absolute basics, file organization, MIDI options.
1. Launch Max, peruse the menus, make sure a USB MIDI keyboard is connected and recognized.
2. Run the first 5 Max tutorials. Remember tht they exist as active Max patchers as well as documents.
Tips on the tutorials:
copy the various Tutorial folders to your own media..there are max tutorials,
msp tutorials and jitter tutorials, each being a Max patcher in its own
right. Some of the tuts require other supporting files, such as graphics,
video, etc. They should all be found in a folder called 'Media' in the
Max 'Patchers' folder. The directory structure is a little different
between the Windows and Mac versions. If you have trouble finding things,
just do a search for the names above.
The help files are just as useful as the tutorials themselves. Copy the
help folder (max-help) to your media as well. You will fid yourself copy/pasting a lot of that material into your own work.
When you open and play with a help file or tutorial, you should save
it under a different name, (e.g. Katy-MaxTut1.pat), so you don't inadvertently
save over the original help file or tut. Also, alt- or option-clicking
on any Max,msp or jitter object will open its help file, which is also
a working patcher.
3. Download and install Supercollider http://supercollider.sourceforge.net/. I will post a few tutorial sets on the blackboard, feel free to start exploring. Supercollider is tool that we will have a couple of guest lectures on by Andrew Grathwohl, who has also graciously offered to be on hand to help with your Supercollider related questions & issues. Again though, six weeks is a woefully short time to absorb the amount of data wrapped up in these platforms, so
Always
explore the patcher(s) we design in class, since they'll mean a lot more
to you than something out of a folder. I post the patches to the blackboard
'course documents' area soon after each class. But don't just look at
them..download them, then butcher them to your own tastes. Don't worry
if you end up with a mess, just try different things. That's the best
way to get warmed up. Eventually you'll probably approach the program
from a more 'problem solving' approach, b ut for now just play. If you're
modification ends up doing something you like, I always encourage you
to have a mini disk loaded up & ready to capture some of the audio output
of your concoction, then you'll have something to play in the next class.
Worth repeating: Max patchers exist in two forms - either a Max Binary
file, or a Max Text file. A Max Text file is just that: text. When you
save to that format from the max program, you can send your work to anyone
via email. It is far less reliable to send a Max Binary file, and if
fact is discouraged. There is absolutely no difference in what gets downloaded
at the other end. Be sure to append .txt to the file name. For your max
binary files, I also urge you to name your files with an extension, either .mxb (max binary) or
.maxpat (patcher).
TERMINOLOGY
|
|||
|
Useful Bibliography: MIDI
bibliography list
Check out The Electronic
Music Foundation for their history of electronic music section.
Class 2
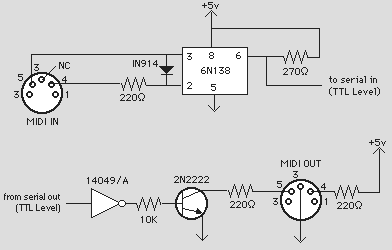
The MIDI Interface
The Musical Instrument Digital Interface should probably have beenreplaced by OSC (Open Sound Control, a newer protocol) by now, yet mysteriously this hasn't happened. Probably because, as low level computer languages go, it's one of the most robust yet simple ever devised. That plus the multitude of legacy MIDI instruments still around pretty much guarantee that it'll be with us for quite a while loger: so it's still a good thing to get under your belt. This session will be a high level discussion about MIDI hardware: how
things are connected, and how MIDI works in the practical sense. In the
process, we'll also deal with any associated audio considerations, patching,
wiring, etc. We'll then explore the built-in MIDI UI in OSX and WindowsXP
and discuss practial ways to connect systems together. We'll
compare a typical hardware synthesizer with
similar software devices (e.g., Reason modules) and discuss the computer integration
of each into a studio.
Main topics:Modes, Channels, Ports, Hardware/cables, How MIDI flows,
discussion of serial communication, wiring, the parts of a MIDI interface. Finally, we'll explore basic setup of Reason and get you started generating sound in that app, initially as a standalone.
Assignment:
Launch Reason. Create your own new bank, setting up the audio and midi
settings to allow live control from a USB keyboard controller. You
may need to configure AudioMidi setup on a mac, though usually simply
plugging in the keyboard after launching will cause it to work.
Once you have the software listening to the keyboard, create a 14 channel
mixer, a Subtractor analog synth, and an NN-XT sampler into your bank.
Browse through patches until you find something you like, then spend
some time studying the synth interfaces, notice which controls are common
to both and which are unique. Use the attached midi keyboard to trigger
sounds from the modules, be sure to experiment with the keyboard controls
(all of them) and observe how each is mapped into the user interface
of the selected device. Listen closely to the changes you can produce
by use of the controls. Save your bank frequently.
Terminology
| PORT | |||
|
|||
| SMF | |||
|
|||
| FORMAT1 |
Class 3
The MIDI specification
In this class well delve deeply into the structure of MIDI, including a review of the binary and hexadecimal numbering systems and their usefulness in coding MIDI. We use one of our Max patchers to view incoming and outgoing MIDI data.. While you may or may not ever use the protocol at this level of detail, you'll find it very helpful to understand the kinds of information that is getting passed between devices. This ties in with our initial examination of musical parameters in class 1: we'll see how the creators of MIDI chose to 'abstract' those parameters into simple byte codes.
Assignment:
1. Study the MIDI implementation chart. Review the structure of status
bytes and data bytes. Commit to memory the hexadecimal and decimal
codes for the following status bytes: note-on (90-9F), patch change(C0-Cf),
control message(B0-Bf), and the control message data bytes for volume
(07), sustain (40), pan (0A), and modulation (01) controllers.
2. As a mental exercise, construct the melody Yankee Doodle (in C) as
a set of 1-line lists in hexadecimal, using properly formatted midi commands
(hint: here's the first note, assuming we're starting on middle c, on
midi channel 1: 90 3C 40 90 3C 00. I suggest that you make three columns & label
them STATUS, DATA1 and DATA2). After you've figured out the commands and notes, think about the melody.
What's the simplest way you could describe the rhythm, or duration, of
each note in the tune? After each line, put down a number that you think
expresses the relative rhythm of the note with each of the others.
3. Practice converting numbers between 0-255 into hex, decimal and binary.
4. Using your Max midi analysis patcher, determine what 10 or so of the incoming sliders/knobs of your midi keyboard are sending into Max. Launch Reason, and using the Reason docs, find a corresponding number of controllers for the module of your choice. Remap the incoming keyboard controllers to the Reason module and play around. You can record the results directly ito the Reason sequencer and export the midi file either as audio or midi.
Class 4
MSP (Max Signal Processing)
We'll start by reviewing the parts/capabilities of an analog 'synthesizer' via Reason’s Subtractor. We'll then explore the ways in which these sounds are achieved in the digital world purely by programming..that is, what concepts underlie the user experience..
Precursors (fortran, csound) and alternatives (RTcmix, Supercollider) to MSP will be discussed, as well as the pros and cons of doing cpu-based synthesis as opposed to relying on hardware synths. Supercollider will be treated in depth further on.
Main topics: synthesis from scratch - creating waves using cycle~, phasor~ and lookup tables; Controlling signal flow and amplitudes; creating envelopes; ways to complexify timbres: FM, Additive synthesis and wavetabling; basic integration with MIDI.
Assignment:
1. Browse through various MSP tutorials (accessible from the help menu). Be sure to do the first five, which are introductory. There is also an excellent folder of MSP examples. There are a number of way to approch learning this material, I always find it best to have a goal in mind. Think of something you'd lke to be able to do, then look for key words in the object list that might fit, try them out with their tutorials/help files, and look in the help file for links to related ojects.
2. Experiment with the basic objects cycle~ and phasor~, observe the effects of plugging one cycle~ or phasor~ into the inputs of another; practice using gate~ objects to control the flow of signal. Be sure to route your objects through a set of *~ objects to control the amplitudes.
3. Create a simple synthesizer using a USB midi keyboard. Like you did with Reason, map incoming controllers to various control points of the objects in your tone generator. Use an envelope generator to control attack/release of both the master volume of the sound as well as another parameter (frequency, harmonic content, etc.)
| Amplitude modulation | |||
| Frequency modulation | |||
| Ring modulation | |||
| Filter | SQUARE |
Terminology
Class 5
Simple Algorithmic Techniques, Sequencing
Having explored live techniques, here we'll use Max as an algorithmic composition/performance tool, and consider ways in which you can make the computer do some of the 'thinking' for you via the use of constrained random processes. We'll also start prettying up our workspace by using sub-patchers, bpatchers, send/receive msgs, etc.. The goal is to start small and build a complex mechanical process through Max's 'object-oriented- nature.
In the process, we'll discuss methods currently in use to shape musical structure, including numerical systems, chaos/fractals, string replacement (L-systems), etc.
Assignment: Using one or more of the techniques explored in class, create your own algorithmic sound machine. Of course, you can also simply hack into the class demo.
Do a Google search for the equation "3n+1" and see what you find. See if you can incorporate it (or one of its type) to generate some sort of midi data in Max.
| Recursion | |||
| BPATCHER | |||
| Cellular automata | |||
| Fractal |
Class 6
Sampling
MSP has many tools for navigating and manipulating digitized audio, aka samples. Now we'll explore the use of buffer~ as a tool for holding temporary audio information, and the ways it can be referenced by a wide assortment of tools, such as groove~.
Assignment:
Create a patcher that records input and automatically writes the recorded buffer~ to an auto-named file in a designated folder. Writing can either occur as soon as recording is done, or via a button. Once you've confirmed that you know how to do the trickier auto-writing method, feel free to modify the write command so that you can name the file whatever you like. Hint: use the sprintf object to set up the autonaming.
A fun variation to the above, in lieu of auto-writing files, is to make a 'ping-pong' recorder, which alternately records into one of two buffer~s, switching after a specified time. You can create an 'echoplex' effect this way, for instance, by feeding back some of the output of one buffer into the other and blending with the live input. Watch your levels, though!
| index | |||
| loop | |||
|
Class 7
MIDTERM PRESENTATIONS. Present an implementation of MIDI or digital audio that youve created using the tools we've been studying, and demonstrate what it does. You may base the project on one of our in-class creations, an assignment, your own research, or it may be a prototype of or prelude to your final project.
2. Remaining class time will be a recap of the midi specification, including status/data bytes, modes, channels, controllers, chief data representation methods, etc. plus Q&A on the previous week's topic of elementary synthesis.
I will also canvass your ideas for possible final projects & make suggestions to get you startd on them.
Class 8
MSP: Advanced Concepts, Intro to Supercollider
We will review concepts from the previous class, and introduce more advanced methods of controlling and analyzing audio, including pitch detection, FFT functions, and a host of sample based applications. We'll quickly examine some of the most useful msp objects and patchers which have been created by third parties, including granular synthesis, FFT related objects, such as pitch~, and the powerful physical modeling suite of objects, percolate~.
We will also cover the poly~ object, how it can be used to multiply your instrument efficiently, and how to set it up with the pattr objects. That will lead into a discussion of the strengths and limitations of MaxMSP you've seen so far, and will form a nice segue to Supercollider. This is a full blown, text based programming environment, so be prepared for some major brain work.
Assignment:
Take the Forbidden Planet MSP example file (FFTfun folder) and modify it into a 4 voice poly~ object that allows for dynamic reconfigurig of the filter curves.
Start going through the Supercollider Tutorials. Version 3.3 is current and is downloadable from here. I recommend the set of tuts by
Class 9
Integration of different tools
This class will zero in on a set of files created by Brad Garton. He illustrates how, in the MaxMSP environment, other tools incluing RTcmix, JSyn, JMSL, ChucK and Supercollider can each contribute unique tools to a given musical experiment.
We will also work through several Supercollider examples, and compare methods employed to get a certain result between it and MSP, discuss pros and cons of each.
Assignment: Mock up a basc synthesizer in MSP using Subtractive, Additive, or FM synthesis. Once you have it working, translate it into Supercollider. Which works better?
Class 10
Jitter: The Basics
Jitter is an integrated suite of objects for Max which allow you to control data as superimposed matrices. This makes it perfectly suited for video work, since a video screen is basically one big matrix of pixels. In this class we'll learn what is necessary to set up basic functionality of jitter and explore some of the most useful manipulation tools, such as jit.op, jit.qt.effect, jit.rota, etc., on still images and imported video files.
Assignment:
From here on out, most of your work sould be put toward your final project. but here is an exercise to get you started with jitter:
Assignment: Load a still image into [jit.qt.movie] ( [...] denotes a Max object). Use [jit.scissors] to split up the image into four quadrants, then use a different jitter object on each of the four quadrants. Finally, use [jit.glue] to reassemble the four pieces into a single matrix again.
Variation: instead of regluing the four, use a few [jit.xfade] objects to crossfade between the quadrants, and send the result to a new [jit.window].
| NTSC | |||
| codec | |||
| dim |
Class 11
Workshop topics and/or Special Guest. Integration of Arduino into Max/Supercollider.
ITP has long been an experimental center for opening up the idea of MIDI controller. The Arduino is a versatile microcontroller that lends itself well to experimentation and general fun. Both Max and SC have libraries for it, and we'll use it to build a controller for one of our software instruments.
Class 12
Final Presentations, Party, etc.